Monday, August 23, 2010

Happy Birthday Dear Sister!

I'm so excited to finally be able to post pics of the card I made Deanna!  I had to wait until she got it in the mail, you know!

This is what the professionals call a Shutter card. It's a lot of fun to make and turns out so pretty!

Thursday, July 22, 2010

Party Planner

I feel like such a party planner!  I just finished up 50 wedding, 4 birthday and 9 baby shower invitations!

I did the wedding invitations with a BRIDES Magazine Invitation Kit that the bride bought at Michaels.  I have to say, it was fairly simple to use and print.  The only issue I had was that my printer didn't like printing on the shiny envelopes, so I had to use address labels, which aren't quite as pretty or fast.

The birthday party invitations were for my son's 3rd birthday.  They say to invite the number of kids for the years old the child is turning, but that just won't work for us. Try as I might, we could only cut it down to 6 'kid-friends' (as NJ like to call them).  He's a little crazy about PBS's Dinosaur Train these days so I wasn't too surprised when he chose DT for his party theme.  In past years I've been a little more papercrafty with the invitations, but I've been playing more with digital scrapbooking lately and ended up going all digital with the invites. They were very simple- a few images, a variety of text and Wa-la!

To keep my traditional paper-crafting side happy, I created little altered comp books for the kids.  I kept it fast and simple (since I was making 7 of them) by only altering the front cover of the books with an outline picture of the Ptreranodon Family to color and a full color DT Logo.  I have no idea what a 3 year old will do with a comp book, but I'm throwing in a box of crayons to help inspire them! By the way, I LOVE that NJ's birthday is near the start of school because I found the comp books for $0.25 each and the boxes of 24 crayons for $0.25 each!

Download .psd
For the baby shower invitations, I wanted to include the mom's nursery theme of purple and lambs but I was really having a hard time finding any lamb stamps. I went in search of lamb line drawings that I could print and came up flat.  When I found a nice photo of a lamb at Morgue File (great place for royalty free images) I decided to experiment with Photoshop Elements some more.  I'm not an Elements pro by any stretch, but I did manage to combine the lamb photo with other free digi elements (frames, paper, flourish...) to create a nice file I could then drop into word, 4 to a page and lay text over it. (next thing to learn in Elements is how to manipulate text in all the ways I know in Word).  If you'd like the .psd version with all it's layers (so you can change it easily), I've uploaded it here for you.  This is the first time I've shared files via 4shared.com, so someone please let me know how it works for you!  If it goes well, I can share more. It appears to have an annoying wait... anyone know of a better free service for sharing large files?

Taking the Plunge

I've done it. I bit the bullet. I dove in. I drank the KoolAid. I bought a Scotch Advanced Tape Glider!

Scotch ATG714 Adhesive Applicator for 1/4-Inch TapeThis puppy is 9.5 inches tall and 7.5 inches wide and a full 1.5 inches thick! Why in the world would I buy such a giant tape roller?  Well, just google Scotch ATG and you'll read the thousands of rave reviews about it.  Apparently it's the best thing since sliced bread, allowing you to roll yards and yards (12) of tape for $1! (Refills are $10 for 72 yards of the acid free tape at Michaels. Use a 40% coupon and pay only $6)
But what really tipped me over on the decision was that Michaels finally started carrying it.  Not only do they sell their Susan G Komen braded ATG with 2 rolls of tape for $35, which is about the cheapest price I've seen on line, but they also let me use a 40% off coupon for it!  So, I got my bright pink monster for $21 plus tax!

Now being the nerd that I am, I know that I usually only get 13 yards for about $3 when I buy my Tombo Mono adhesive with coupon.  If I subtract $6 for the two rolls of tape included with my ATG, my initial investment is down to $15.  So, I'll need to burn through about 100 yards or three additional rolls of ATG tape to recoup my initial investment. How long will that take? I have no idea. I only keep so much data in this little brain of mine.

Tuesday, July 6, 2010

Inspriation

I've been on a bit of a break from scrapbooking. I had been working chronologically and I got to a set of pictures that brought back some bad memories and even though I tried to just skip them with the intent of coming back to them later, it kinda derailed me.  I've been making cards and gift sets and a few altered composition books, but I'm still struggling to get back to scrapbooking, which I love.

This last weekend, while on vacation in Tucson, I stopped by Bookmans, an Arizona chain of used bookstores, and found a few old issues of Simple Scrapbooks.  I discovered this magazine and decided to subscribe to it the same month (May/June 2009) they decided to stop making it. So I will occasionally buy a back issue and savor it, cover to cover.

In their Jan/Feb 2008 issue they had an article about journaling entitled Write From The Heart, by Elizabeth Dillow.  She talks about how one of her favorite writers, Anna Quindlen, wrote an article for Newsweek, Write For Your Life, about the "demise of everyday prose." (Please, go read Write For Your Life, whether or not you ever scrapbook, it's truly inspiring.) Dillow then goes on to give some tips for more prose-like journaling in your scrapbooking.  In one example (done by another scrapbooker) we can read a "note to self" where one mom tries to keep things in perspective by reminding herself about the joys her young children bring her in spite of the challenges they create.  Something about the tone and content of the note really caught my attention.  I was crying by the end, which felt very silly, but I was also wanting to do some scrapbooking and journaling so that I will never forget how sweet my boys are and how very unique this stage of life is.

here's the layout- hopefully it will inspire you too.

 Simple Scrapbooks, Vol 7, Issue 1, Jan/Feb 2008, page 61

Tuesday, May 18, 2010

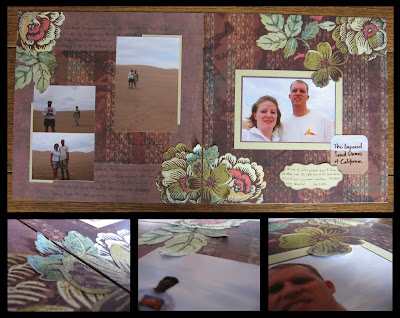
Sand Dunes

This next layout I did in Photoshop Elements first, thinking maybe I'd start doing more digital scrapbooking. However, it ended up feeling a lot like work instead of creation. I guess I view my craft stuff more like art... So, I printed the photos and did it all traditional instead.
I used an idea from Paperclipping to cut the flower on the background paper and tuck the photo under it (bottom right close up). Then I used a third piece of the background paper to add some extra flowers so I had a visual triangle. Looking back, I wish I'd made my visual triangle a little less symmetrical, but I'm still learning!

Monday, May 17, 2010

San Diego Memories

This layout is about our first trip to San Diego after moving back to the west coast. It was a great trip and I love remembering the magic that the coast held for me back then.
I modeled this after another Becky Higgins sketch. She advocates sketching out your layouts prior to printing your photos and a book I have of hers provides a lot of sample sketches to help you with ideas. I've been enjoying this plan-before-you-scrap method, although I don't know if I'll stick to it.

I actually did some stamping on this layout. I do a lot of stamping for cards, but don't tend to stamp for scrapbooks- who knows why... Anyway, I stamped the title with a new set of two-step letter stamps and stamped the sea shells and then cut them out.

Wednesday, May 12, 2010

Hiking in Arizona

I'm in a blogging mood, so I thought I'd share some of my latest scrapbook layouts. I've been working on scraping 2006, so these are all from way back then...

This one is from our first spring here! I started with a Becky Higgins sketch and adapted it as needed. I used the Cricut to cut out the letters and I really like the clean simple look. However, I did have one problem: I had printed the small 2 inch square photos, 6 to a 4x6 print. It turns out that 4x6 prints are always a little smaller than 4x6, so I ended up having to cut them all down smaller so there were all the same size.

Mother's Day Cards

I made a big batch of Mother's day cards again this year! Last year I sent out 6 (to my mom, 2 grandmas, my mother-in-law grandmother-in-law and sister), but this year, I added my sister's mother-in-law, because she's like a grandma to my boys. Plus I made a few to sell in my etsy store. I really got on quite a roll and it was a lot of fun!

Now if only I would sell a bunch more on etsy so I could buy more supplies!

Wednesday, March 17, 2010

Happy Birthday Hubby

I just realized that I hadn't ever uploaded a pic of the card I made for my hubby's birthday. It was a while ago- let's just pretend I was waiting so all you strangers would have no idea when his birthday is- he'd like that! ;)

Ok, so I shamelessly copied the design from an idea book and traced/drew the deer onto vellum. I free handed the "to my" and "wonderful" based on a font I saw in a book. The only stamps on the card are on the three blocks at the bottom- the two designs and the word "man."

You'll all be happy to hear that he deemed it a manly card as well!

Saturday, January 16, 2010

Christmas Layouts

Each year I try to add two more years to my Christmas album- the current year and the next oldest year. So this year, during the Christmas season I worked on 2001 (shown at right here- click to enlarge). I used some of the new Martha Stewart paper my sister got me for Christmas.

Now I'm working on 2009. At first, I wanted to keep it to one spread (two facing pages) per year, but as we all get crazier with our digital cameras I find myself having a harder and harder time keeping each year down to one spread. In fact, I think 2008 has 3 spreads plus 2 more spreads of all the photo cards people have sent! So my new goal for 2009 is to limit myself to two spreads plus 1 spread with all the photo cards.

It seems like each year more people switch from a traditional card to a photo card. I love the photo cards- for many of our friends, it's the only printed picture we have of them for the whole year, so I'm determined to keep them. However, I don't really want to end up with more than half my album being a collection of photo cards. So, when a friend showed me Ali Edwards' solution, I was in love! Of course, I had to add some white space to be happy and I couldn't quite stand to cut off people's faces, so here's what mine turned out like this year!

Here's some previous year's Christmas spreads in case you're interested!
2006
2007
2008a 2008b

(click to enlarge photo)